
DigiDigz on the Web
ICONS & CONTROLS
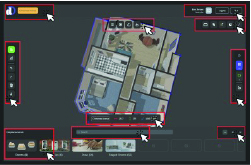
Icons are grouped on the screen according to their function. Please refer to the image beside this text and then select a group by clicking an area outlined in red. Return to this image any time by clicking the GO BACK icon beside each category.
Icons are grouped on the screen according to their function
Description
General plan information appears at the top left of the screen with the plan name (ie. unit name or street address) highlighted in orange.
The plan name is assigned or updated in the measurement panel.
At the right of the plan name is a button for each floor level contained in the plan. Click on a button to isolate and zoom in on a floor level.
Click the plan name to return to the dollhouse view.